
Migrating virtual machines (VMs) between different virtualization platforms can seem daunting. Fortunately, with the hv2pve script, transferring VMs from Hyper-V to Proxmox becomes much more manageable. In this post, I’ll walk you through how to prepare your environment and perform the migration step by step.
1. Prerequisites – Before You Begin
First, download the files from our repository https://github.com/blackrack/hv2pve. You’ll need to edit the env.json configuration file and provide all required parameters. Here’s a sample configuration:
"HYPERV_IP": "192.168.100.129",
"HYPERV_USER": "administrator",
"HYPERV_PASS": "YourPassword",
"HYPER_VM_LIST": [
  "UUID_vm_1",
  "UUID_vm_2"
],
"HYPERV_AUTO_SHAREDISK": true,
"HYPERV_SHAREDISK_MAPPING": [
  {
    "C:/VMDisks": "VMDisks",
    "PROXMOX_STORAGE": "data"
  },
  {
    "E:/VMDisksSSD": "VMDisksSSD",
    "PROXMOX_STORAGE": "space"
  }
],
"PROXMOX_IP": "192.168.100.252",
"PROXMOX_USER": "root",
"PROXMOX_PASS": "YourPassword",
"PROXMOX_MOUNTPATH": "/root/tmp",
"PROXMOX_IMPORTPATH": "/root/import",
"PROXMOX_STORAGE": "data",
"PROXMOX_SWITCH_DEFAULT": "vmbr0",
"PROXMOX_SWITCH_MAPPING": {
  "UUID_switch": "vmbr1"
},
"PROXMOX_NETWORK_TYPE": "e1000",
"PROXMOX_START_AFTER": true,
"PROXMOX_IMPORT_ONCE": false
💡 Tip: You can retrieve UUIDs of VMs and switches using PowerShell on the Hyper-V host.
2. Preparing the VMs and Hyper-V Host
In the prep_script folder, you’ll find helper scripts that must be executed:
prep_hyper-v.ps– run on the Hyper-V host to prepare it for migration.debian.sh– run on Debian-based guest systems.rocky.sh– run on RHEL-based systems like Rocky Linux.
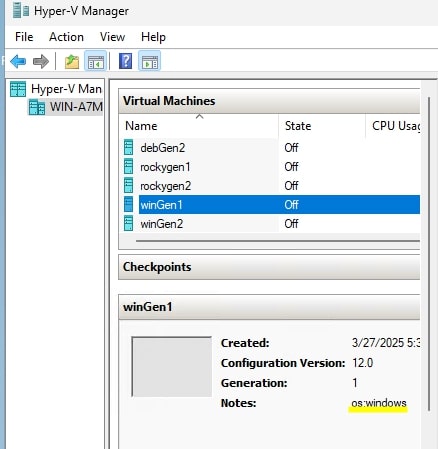
Additional step for Windows guests:
➡️ In Hyper-V Manager, under the VM’s “Notes” section, add os:windows.
3. Setting Up the Proxmox Environment
On the Proxmox host (or the machine running the script), perform the following:
- Create a Python virtual environment:
python3 -m venv ./venv - Activate the virtual environment:
source ./venv/bin/activate - Install required dependencies:
pip install -r req.txt - Fill in the
env.jsonfile as shown earlier. - Perform a pre-check:
make dryrun
4. Running the Migration
When you’re ready, you can launch the migration with:
- Standard migration:
make run - Debug mode (for detailed logging):
make debug
Where to Find the Required Information for env.json
1. VM UUIDs (HYPER_VM_LIST)
On the Hyper-V host, use PowerShell:
Get-VM | Select-Object Name, Id
This will list all VM names and their UUIDs. Example:
| Name | Id |
|---|---|
| winSerwer | 8de199b6-d858-45d6-81ef-55eb7a3dbf6f |
| debianHost | 62ac9e25-800c-4546-a97e-7f6141bf9ea4 |
Copy these identifiers into the HYPER_VM_LIST section.

2. Switch UUIDs (PROXMOX_SWITCH_MAPPING)
Use this PowerShell command to list virtual switches and their IDs:
Get-VMSwitch | Select-Object Name, Id
Example:
| Name | Id |
|---|---|
| ExternalNIC | f3f8527d-2d64-4636-a1b4-bf84d2816fbd |
In PROXMOX_SWITCH_MAPPING you can assign these switches to the corresponding bridges in Proxmox, e.g. vmbr1, vmbr2.

3. List Available Bridges in Proxmox
On the Proxmox host, run:
cat /etc/network/interfaces
Look for entries like:
auto vmbr0
iface vmbr0 inet static
    ...
These are the bridges (vmbr0, vmbr1, etc.) you can reference in the configuration.
4. Disk Mapping Explained
If your Hyper-V host stores VM disks in multiple locations (e.g., C:\VMDisks, E:\VMDisksSSD), you can map each one to a specific storage in Proxmox (e.g., data, space).
This allows, for example, to migrate SSDs to high-speed storage in Proxmox.
Example:
{
  "C:/VMDisks": "VMDisks",
  "PROXMOX_STORAGE": "data"
}
This tells the script to import disks from C:/VMDisks into the data storage on Proxmox.
5. What Are PROXMOX_MOUNTPATH and PROXMOX_IMPORTPATH?
PROXMOX_MOUNTPATH: Temporary mount point for SMB shares from Hyper-V.PROXMOX_IMPORTPATH: A local directory where the converted.qcow2files will be stored before final import.
Helpful Tips
- Always run
make dryrunbefore actual migration to validate your setup. - Use
make debugto troubleshoot if something fails. - For Windows VMs, make sure to add the note
os:windowsin Hyper-V Manager under the VM’s Notes field.
Summary
Migrating from Hyper-V to Proxmox doesn’t have to be difficult. Thanks to automation and the hv2pve script, the process becomes straightforward. With the right preparation and configuration, you’ll be up and running on Proxmox in no time!
Got questions or want to share your experience? Contact us!